Tri-Alliance Clash

Description
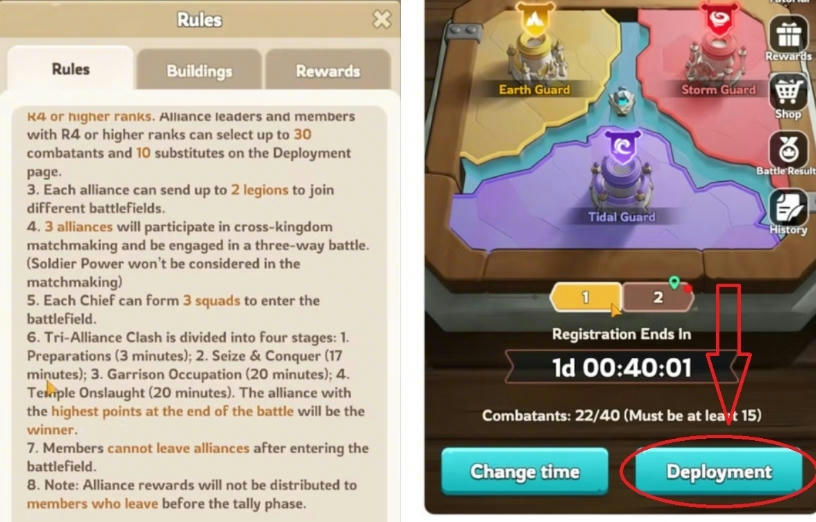
The Tri-Alliance Clash is a recurring cross-kingdom event that takes place every four weeks. Three alliances are matched together and engage in a structured, multi-phase battlefield competition. Victory is determined by point generation, territory control, and ultimately holding the Temple of Tides.
Event Phases
Phase 1 – Preparation (3minutes)
- R4/R5 prepare marks on the map
Phase 2 – Seize & Conquer (17 minutes)
- Early building captures determine long-term stability.
- Lanes secure their keypoints and early structures.
- Supporters take their assigned positions behind their Main Player.
- Central teams capture uncapped neutral buildings.
Phase 3 – Garrison Occupation (20 minutes)
- Garrisons become available and must be secured.
- Pressure is applied across lanes to prepare for the final rotation.
- Special Forces disrupt enemy structures and attack their backlines.
Phase 4 – Temple Onslaught (20 minutes)
- The Temple of Tides, worth 1.800 points per minute, becomes the primary objective.
- Coordinated rotation from all lanes ensures strong positioning.
- Holding the temple usually determines the winner.
Matchmaking Rules
- 3 alliances face each other in a three-way match.
- Soldier Power is not considered for matchmaking.
- Each alliance may register: 30 combatants + 10 substitutes
Deployment Rules
- Each player can field three squads.
- Each alliance can send two legions to the battlefield.
- Two Commanders are assigned exclusively to buff management.
- Members cannot leave the alliance after entering the battlefield.
Tips & Guides
A successful Tri-Alliance Clash depends on a clear and disciplined role structure. Every participant has a defined purpose, ensuring lane stability, high map control, and coordinated pressure throughout all phases.
This section outlines all roles, their responsibilities, and their strategic importance.
Main Players (6 total)
Primary Responsibilities
- Capture the first keypoint of their lane as quickly as possible.
- Maintain constant frontline pressure.
- Prevent enemies from advancing toward internal territory.
- Coordinate with their two Supporters for healing rotation.
- Hold key structures to secure long-term point income.
Supporters (12 total – 2 per Main Player)
Supporters ensure their Main Player can stay at the frontline without downtime, which is the key to strong lane control.
Responsibilities
- After the keypoint is secured, position themselves in the building directly behind the Main Player.
- Step forward situationally when the Main Player needs to heal.
- Hold the position during the Main Player´s brief retreat.
- Ensure the keypoint is never left unmanned.
- Provide constant stability and presence.
Strategic Impact
- Prevents the Main Player from having to respawn and walk back for 2 minutes.
- Enables continuous pressure on the enemy lane.
- Ensures that keypoints remain secure at all times.
Supporters should never push ahead recklessly. Their strength lies in stability, not aggression.
Special Commander Force (6 Players)
a breakthrough unit specialized in encirclements, deep pushes, and high-impact disruption.
Key Mechanics
- Each player has 3 squads – a total of 18 squads.
- Five squads are required to bypass a building (“skip rule”)
- With 18 squads, this team can rapidly push through multiple buildings.
Responsibilities
- Break through weak enemy lanes.
- Capture multiple structures in quick succession.
- Disrupt enemy backlines by taking under-defended buildings.
- Force enemy rotations, reducing pressure on allied lanes.
- Create chaos before Phase 4 to weaken the opponent´s temple push.
Strategic Impact
This is one of the strongest tactical tools in the entire event. Disruption in the enemy´s rear structure can decide the match long before the Temple phase begins.
Reaction Teams (6 players total – 2 teams of 3)
Flexible teams designed to secure early neutral buildings and stabilize the battlefield.
Early Game Role
- Move into the central region at the start of the event.
- Capture all buildings not covered by the Main Player lanes.
- Prevent enemy teams from gaining early point advantages.
Mid & Late Game Role
- Provide situational defense against enemy pushes.
- Stop opponents attempting to enter allied territory via side routes.
- Recover buildings lost during temporary lane pressure.
- Support lanes that are momentarily overwhelmed.
Strategic Impact
These teams maintain map stability, prevent snowballing by enemy forces, and secure essential structures that the main lanes cannot reach.
Commanders
Both Commanders are purely dedicated to buff management.
Responsibilities
- Coordinate buff cycles with lane skirmishes, building captures, and engagements.
- Maintain constant awareness of battlefield momentum.
Ideal Commander Profile
- Smaller, highly active players.
- Able to stay online and focused for the entire 60-minute event.
- Not part of the main lane fighting.
Why are commanders vital?
Proper buff timing can significantly shift the outcome of lane fights or temple battles. Misused or mistimed buffs directly weaken the entire group.
Map & Buildings
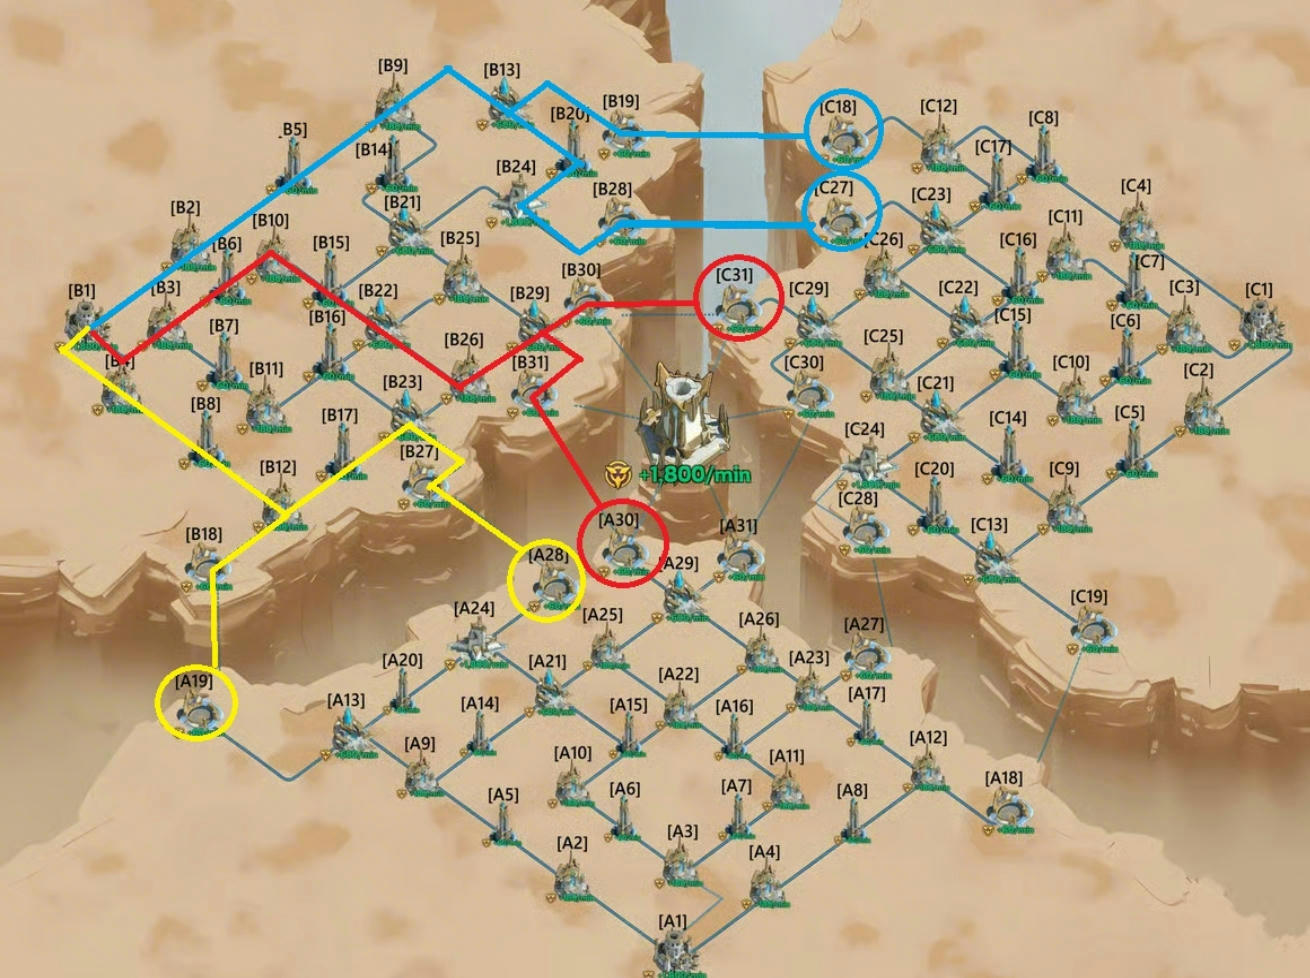
Understanding the map layout and the value of each building type is essential for making informed tactical decisions. The battlefield is divided into six lanes, each assigned to one Main Player:
- Lanes 1,4,5 Upper half of the map
- Lanes 2,3,6 Lower Half of the map
- All lanes converge toward the central Temple of Tides, the most valuable structure in the event.
Key Features
- Every lane has a primary keypoint that must be captured early.
- Behind each keypoint lies a building where Supporters position themselves.
- Multiple neutral buildings exist in the central region, captured by the Reaction Teams.
- The map supports both straightforward lane fighting and complex flanking tactics.
Building Capture Mechanics
Squad Requirement (“Skip Rule”)
- To bypass a building without capturing it, at least five squads must be present.
- This mechanic is the foundation of the special commander force’s breakthrough strategy.
Early Game Strategy
The early game determines the stability of every lane and strongly influences the mid and late phases. A disciplined start, precise movement, and correct Supporter positioning are essential for long-term control.
Optimal Movement Routes for Main Players
Each of the six Main Players follows a predefined route to reach their lane´s keypoint as fast a s possible. These paths are optimized for:
- shortest walking distance
- minimal node intersections
- early uncontested capture
- safe positioning for Supporters
- stable lane control from the first minutes
Supporter Placement (Immediately After Keypoint Capture)
Once the Main Player secures the keypoint:
- Both Supporters move into the building directly behind the Main Player.
- Supporters remain stationed there unless the Main Player needs relief.
- The building becomes the rotational anchor point for the lane.
Purpose of This Positioning
- Ensures the keypoint is never undefended
- Provides instant reinforcement
- Enables rotation-based healing without losing lane presence
Healing Rotation System ( Main Player + Supporters)
This system guarantees continuous pressure on the enemy lane.
Process
- When the Main Player becomes weakened:
- One Supporter advances to take over the frontline temporarily
- The Main Player retreats briefly to heal
- after healing, the Main Player returns immediately
- The Supporter falls back to the anchor building
Why This Is Critical?
- Prevents the Main Player from being defeated
- Avoids the 2-minute respawn walk from HQ
- Maintains uninterrupted frontline strength
- Keeps the keypoint secure at all times
This structure is significantly stronger than any solo or uncoordinated approach.
Central Region Capture (Reaction Teams)
While Main Players secure lanes:
The two Reaction Teams (3 players each):
- Move into central area immediately
- Capture all neutral buildings not within lane routes
- Ensure the alliance gains maximum early points
- Prevent enemy teams from taking easy structures
This creates:
- a safe interior
- additional point income
- a buffer zone for midgame movement
When Early Game is Executed Correctly
Your alliance achieves:
- 6 secure lanes
- 6 captured keypoints
- all central buildings controlled
- full supporter rotation capability
- freedom to prepare Garrisons and Special Force operations
- map stability and momentum
This advantage compounds throughout the match and becomes decisive in later phases.
Mid Game Strategy
The mid game is where long-term advantages are secured. Maintaining lane stability, capturing Garrisions, and applying coordinated pressure prepares the entire alliance for the final temple fight.
Phase 2 Seize & Conquer
Objectives
- Secure the primary keypoints on every lane
- Capture nearby Ruins and Cluster of ruins
- Position Supporters correctly
- Begin contesting early Garrison areas
- Control the central neutral zone
Lane Responsibilities
Each Main Player:
- advanced steadily
- holds their keypoint
- avoids unnecessary deep pushes
- maintains communication with supporters and commanders
Lane integrity is critical. A lost lane becomes a major weakness in Phase 4.
Phase 3 Garrison Occupation
Garrisons become available and represent significant point income and end-of-event scoring. They are strategically vital.
Objectives
- Secure available Garrisons
- Reinforce lanes that come under enemy pressure
- Prepare lanes for a synchronized rotation toward the central temple
- Maintain strong map presence and pressure
Lane Strategy
- Maintain control of the keypoint
- Slowly expand forward but avoid overextending
- Use Supporter rotation to stay consistent
Special Commander Force Operations (6 players)
The Special Force becomes highly active in Phase 2 and dominates Phase 3.
Mechanics
- Total squads: 18
- Required squads to bypass (“skip”) a building: 5
- This allows extremely fast multi-structure breakthroughs
Typical Sequence
- Identify a weak enemy lane or empty structure path
- Push through with all 6 Players
- Skip low-value buildings when possible
- Capture high-value targets in the backline
- Retreat or reposition before counter-pressure hits
Strategic Impact
- Disrupts enemy map control
- Diverts enemy attention from your main lanes
- Creates high-value point swings
- Weakens the opponent’s ability to contest the temple later on
Reaction Teams (2 teams of 3 players)
The Reaction Teams remain active throughout Phases 2 and 3.
Primary Duties
- Reinforce lanes that come under heavy attack
- Stop enemy breakthrough attempts
- Re-take buildings lost temporarily
- Maintain control of central structures
- Support keypoint recovery if required
Why They Matter
Enemy alliances often attempt side-route attacks or targeted pressure against weakened lanes. Reaction Teams prevent such advances and stabilize the battlefield.
Maintaining Map Stability
Mid game success relies on discipline:
- Main Players do not wander off their lanes
- Supporters remain at their anchor buildings
- Special Force pushes only as a full group
- Reaction Teams move only when necessary
If all roles adhere to their responsibilities, the alliance enters Phase 4 with a clear and powerful advantage.
Team Composition Overview (Combatants)
A clear and consistent team structure is essential for executing the full strategy described in this guide.
This section provides an overview of the recommended composition for all 30 combatants an alliance can field.
Summary of All Roles
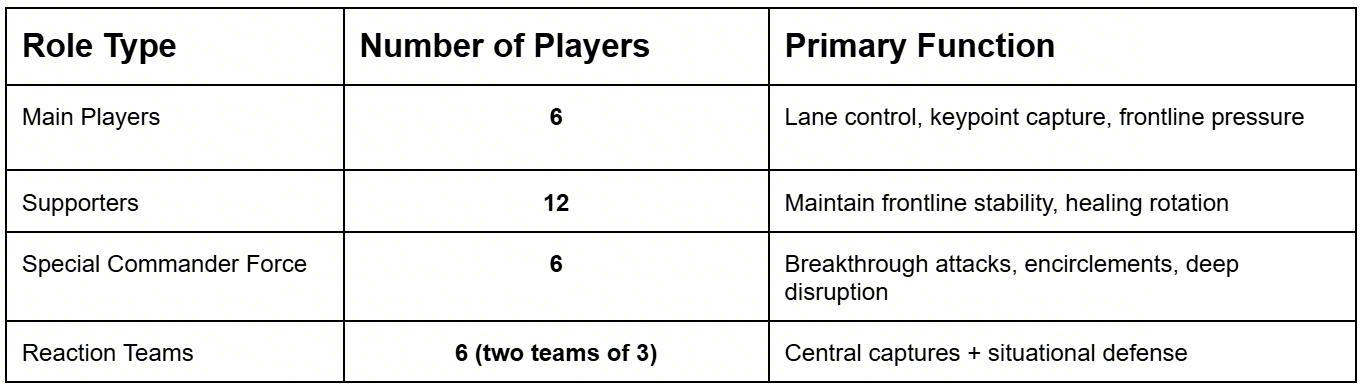
This structure ensures every lane is supported, the map is stabilized, and both offensive and defensive needs are covered.
Final Recommendations & Best Practices
This final section summarizes key strategic principles that significantly increase the chances of winning the Tri- Alliance Clash. These recommendations reinforce the structured approach throughout the guide and ensure optimal execution at every stage.
Maintain Lane Discipline
Lane control is the foundation of victory.
- Main Players must stay on their assigned lanes
- Supporters must remain positioned behind the keypoint
- Reaction Teams should only rotate when necessary
- Special Force should never split up
Undisciplined movement often leads to lane collapse and loss of strategic positioning.
Do Not Overextend
Pushing too far without support is one of the most common mistakes.
- Only push as fast as your Supporters can safely follow
- Avoid deep solo pushes into enemy territory
- Maintain proximity to anchor buildings for quick rotations
Overextension creates vulnerabilities that experienced enemies will exploit.
Keep the Temple as the Endgame Priority
Everything before Phase 4 prepares for the temple fight.
- Rotate lanes together
- Maintain group formation
- Hold the temple area tightly
- Protect the approach routes
Use Special Force to Disrupt, Not to Duel
This unit is designed for breakthrough operations.
- Always move as a group
- Target weak paths or undefended buildings
- Avoid wasting time on extended fights
- Focus on fast captures and chaos creation
Proper use of Special Force weakens enemy structure and strengthens your temple chances.
Reaction Teams Must Stay Flexible
Reaction Teams keep the map stable.
- Promptly address enemy breakthroughs
- Retake lost buildings quickly
- Maintain control of the central region
- Support lanes that are temporarily overwhelmed
Flexibility ensures long-term map dominance.
Communication is Essential
A coordinated team performs significantly better.
- Main Players should report lane status
- Supporters should announce rotations.
- Commanders should focus on buffing.
- Reaction Teams should inform about enemy movement
- Special Force should coordinate breakthroughs in advance
Good communication prevents confusion and ensures the team moves as a unified force.
End Strong
The final minutes of the event are often decisive.
- Maintain temple defense
- Keep formation tight
- Avoid unnecessary deaths
- Hold key buildings around the temple
A disciplined finish can overturn even a midgame disadvantage.